Categories
Disney Cruises Disney Food Disney Parks Disney Recipes

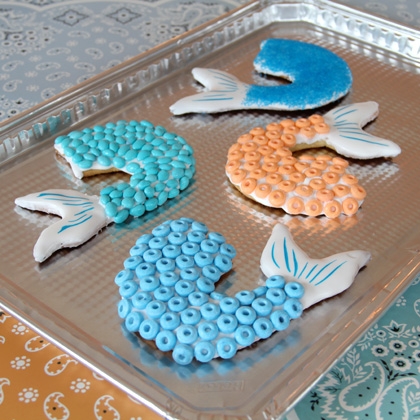
Mermaid Hair, Don’t Care! Disney Cruise Line’s Mermaid Tail Cookie Recipe is Perfect for All Sea Dwellers!

Ahoy, swashbuckling pirates and mermaids! Grab your beach towel and your flip flops! #DisneyCruiseLife at Home just dropped a mind-blowing cookie recipe to add to your summer to-do list.

Mermaid Hair, Don’t Care! Disney Cruise Line’s Mermaid Tail Cookie Recipe is Perfect for All Sea Dwellers!

© Disney

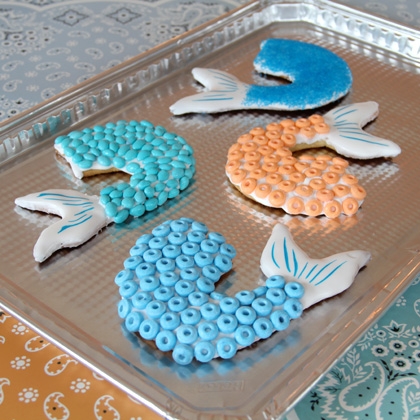
You’ll be singing sea chanties while you mix up these mouth-watering Mermaid Tail Cookies! No need to make your own crustacean *ahem* creation, we’ve got the recipe for you right here!

Follow along with the recipe from Disney Family below and make a splash with these yummy treats! While you’re at it, don’t forget to try this Chocolate Soufflé recipe or these Guava Glazed Ribs recipe from Disney Cruise Line too! We think these recipes are perfect for going under the sea.

Mermaid Hair, Don’t Care! Disney Cruise Line’s Mermaid Tail Cookie Recipe is Perfect for All Sea Dwellers!

© Disney

Ingredients

  • Batch of chilled sugar cookie dough (homemade or store-bought)
  • Flour
  • Rolling pin
  • Wax paper
  • Baking sheet
  • Cooling rack
  • Kitchen knife
  • White cookie icing
  • Candy necklaces or other small candies
  • Colored sugar (optional)
  • Food decorator pens (optional)

Helpful Tip

If the store-bought brand of dough you use is too soft to hold the cookie shapes during baking, you can knead in a little extra flour to stiffen it before rolling it out.

Directions

  1.  Print the template from the Disney Family website and cut it out. Roll out the dough on a floured surface to 1/4-inch thickness, then use the template and a knife to cut out mermaid tail cookies. Bake the cookies according to the recipe directions and let them cool.
  2.  Working with one cookie at a time, spread cookie icing on the tail fin. Then spread more icing on a 2-inch section of the tail just above the fin and gently press candies into it, arranging them close together to resemble scales. Continue frosting and decorating the rest of the tail a section at a time until you reach the top. Or, you can simply sprinkle colored sugar on the icing in place of the candy.
  3.  Set the cookies aside until the icing hardens. Then use food decorator pens to embellish the tail fins with colorful lines, if you like.

Mermaid Hair, Don’t Care! Disney Cruise Line’s Mermaid Tail Cookie Recipe is Perfect for All Sea Dwellers!

© Disney

There you have it! We think these cookies are fit for a Mermaid Princess! Plus, they are the perfect substitution for all the Mermaid Cupcakes that we miss so much. These cookies should tie us over until we make it back to Magic Kingdom!

Did you make the mermaid cookies? Let us know how they turned out!

From our friends at www.disneyfoodblog.com
Filed Under: disney cruise line, Disney News, Featured, News, Recipe, copycat recipes, disney at home, disney recipes, mermaid, mermaid cookies, Mermaid Cupcake, recipes
Categories
Disney Food Disney Parks Disney Recipes

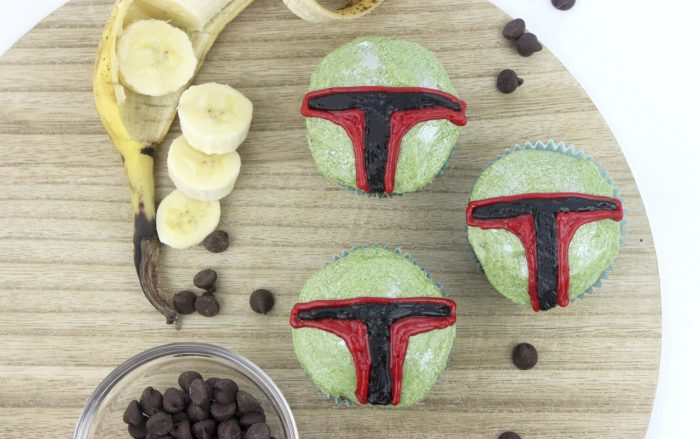
Recipe: These Boba Fett Banana Bread Muffins Are Out of This World!

Did you know that Star Wars: The Empire Strikes Back recently celebrated the 40th-anniversary of its theatrical debut? And what better way to celebrate than by baking up some delicious muffins!

Recipe: These Boba Fett Banana Bread Muffins Are Out of This World!

Millennium Falcon: Smugglers Run in Star Wars: Galaxy’s Edge

Looking for dessert after you’ve finished your Ronto Wrap and Fried Endorian Tip-Yip? These Boba Fett Banana Bread Muffins are Galactic Empire-approved!

Even the most fearsome bounty hunters have to refuel! So, whip out your apron and pre-heat that oven because it’s time to start baking!

Recipe: These Boba Fett Banana Bread Muffins Are Out of This World!

©Star Wars

Ingredients

Muffins

  • 2 cups all-purpose flour
  • 2/3 cup brown sugar
  • 1 teaspoon baking soda
  • 1/2 teaspoon cinnamon
  • 1/4 teaspoon salt
  • 1/2 cup (1 stick) unsalted butter, melted
  • 1/4 cup sour cream
  • 3 ripe bananas, mashed
  • 2 large eggs
  • 2 teaspoons vanilla
  • 1 cup chocolate chips
  • 1/2 cup walnuts

Frosting

  • 1/2 cup (1 stick) unsalted butter, softened
  • 3 cups powdered sugar
  • 3 Tablespoons whole milk
  • 1/2 teaspoon cinnamon
  • 1/2 teaspoon vanilla
  • Pinch of salt
  • Green food gel dye
  • Edible shimmer dust
  • Red food gel dye
  • Black food gel dye

Instructions

  1. Preheat the oven to 350 degrees. Prep a muffin tin with liners.
  2. In a large bowl, whisk together the flour, brown sugar, baking soda, cinnamon, and salt.
  3. Make a well in the center of the dry ingredients and stir in the butter, sour cream, mashed bananas, eggs, and vanilla, until just combined. Fold in the chocolate chips and walnuts.
  4. Spoon the batter into the prepped muffin tin. Bake for 17-19 minutes, until a toothpick test comes out clean. Let cool on a wire rack.
  5. In the bowl of an electric mixer, combine the butter, powdered sugar, milk, cinnamon, vanilla, and salt, until fluffy.
  6. Separate the frosting into three bowls, placing 1/2 in one bowl and stirring in the green food gel dye and shimmer dust to create a metallic icing. In the second bowl place 1/4 of the frosting, stirring in the red food gel dye. Into the third bowl stir the remaining frosting with black food gel dye.
  7. Spread the icing onto the muffins to create Boba Fett’s signature look.

We know we’ll be baking these Boba Fett Banana Bread Muffins to get our Star Wars fix until our next visit to Star Wars: Galaxy’s Edge!

Have you baked these Boba Fett Banana Bread Muffins? Share your review in the comments!

From our friends at www.disneyfoodblog.com
Filed Under: Featured, News, Recipe, Snacks, banana bread, banana bread muffins, Boba Fett, boba fett banana bread muffins, Disney recipe, disney recipes, disney recipes at home, DIY Disney Recipe, diy disney recipes, star wars recipe

Categories
Disney Food Disney Parks Disney Recipes Other

Make Snow White and the Seven Dwarves Donuts at Home

Snow White Donut

Everyone knows that if Snow White could have saved herself a lot of trouble if she’d had a donut instead of that apple. If you’d also like to stay on the safe side but make sure that your snack is the fairest of them all, then try making these ”Snow White and the Seven Dwarves” donuts!
This Disney recipe requires a donut pan and makes 12 baked rings of deliciousness. No need for wishing wells, they’re pretty easy to make!

Ingredients

DONUTS:

  • 2 Cups all-purpose flour
  • 2/3 Cup granulated sugar
  • 2 Tsp baking powder
  • 2 Tsp ground cinnamon
  • 1 Tbsp salt
  • 2 eggs
  • 2/3 Cup whole milk
  • 4 Tbsp unsalted butter, melted
  • 1/2 Cup unsweetened applesauce
  • 1 Tsp vanilla extract
  • Donut pans
  • Piping or zip-top bag
  • Scissors
  • Toothpick

GLAZE:

  • 2 Cups powdered sugar
  • 1/4 Tsp clear vanilla extract
  • 1/2 Cup heavy cream
  • Gel food coloring (red, blue, green, yellow, brown, beige)
  • Piping or zip-top bags
  • Toothpicks

DECORATION:

  • Melted dark chocolate
  • Shredded coconut
  • ROYAL ICING (HATS, APPLE STEM & LEAF):
  • 2 Cups powdered sugar
  • 1 1/2 Tbsp meringue powder
  • 1/4 Tsp vanilla extract
  • 1/2 Cup warm water
  • Gel food coloring (red, green, yellow, blue, brown, purple)
  • Piping or zip-top bags

DIRECTIONS:

  •  Preheat oven to 350° F.
  •  Spray the donut pans with non-stick cooking spray or coat with melted butter. Set the pans aside.
  •  In a large bowl, whisk together the flour, sugar, baking powder, ground cinnamon, and salt.

  •  In a smaller bowl, whisk together the eggs, milk, butter, applesauce, and vanilla extract.
  •  Add the wet ingredients to the dry ingredients and stir together until all are combined and no flour clumps remain. Try not to overmix the batter!
  •  Pipe the batter into the donut cavities using a piping or zip-top bag. Cut a corner off the bottom and pipe the batter into each cavity, filling 3/4 of the way. Bake in the oven for 10-12 minutes.

  •  Remove donuts from the oven and allow to cool in the pan before inverting them onto a wire rack. (Tip: To help release the donuts, use a toothpick to loosen the sides.) While they’re cooling, make the glaze.
  •  In a medium bowl, whisk together the powdered sugar, vanilla extract, and heavy cream. (If the glaze is too thick, add additional cream-about 1/2 teaspoon at a time until the desired consistency is reached).

  •  Divide the icing into 7 small bowls to make red, beige, brown, green, blue, yellow, and white (leave icing as is for white).

  •  Add food coloring into each bowl, corresponding to each of the character’s clothing. For Snow White and the Dwarfs, dip 1/3 of each into the beige icing for their faces. Then add on a nose with the same beige color, using a toothpick. Spread on the other colors for their clothes with the back of a small spoon.

  •  For the Dwarfs’ beards, pipe white icing then sprinkle shredded coconut on top.

  •  Using melted dark chocolate and a toothpick, draw the faces, belts, and Snow White’s hair.
  •  Make the royal icing: Add powdered sugar, meringue powder, vanilla extract, and water into the bowl of a stand mixer with the whisk attachment. Start mixing on low until incorporated and then beat on medium-high until stiff peaks form (around 5 minutes).
  •  Divide the icing into separate bowls and add the food coloring needed for each detail (hats, bow, and apple leaf/stem). Then use the royal icing to pipe the shapes onto parchment paper (red for Snow White’s bow, green for the apple leaf/stem, and various colors for the hats). Let them dry (takes approximately 1-2 hours). 

  •  Then peel off the parchment. Attach the pieces onto the character donuts with a bit of white royal icing (which acts as glue), and they’re ready to go. Enjoy!

Photos and recipe courtesy of Disney

From our friends at chipandco.com
Filed Under: Other Disney Stuff, disney donuts, Disney DYI, Disney Food, Disney Recipes, Disney Snacks, Donuts, Snow White, Snow White and the Seven Dwarves

Categories
Disney Food Disney Parks Disney Recipes Other

Disney Recipe: Make PB & J Rolls from Disney California Adventure’s Lamplight Lounge

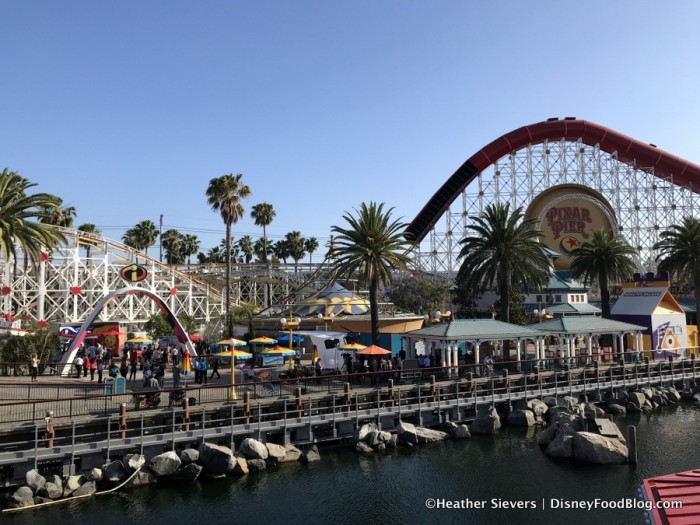
Lamplight Lounge at Disney California Adventure’s Pixar Pier brings the flavors of childhood together with the class and elegance of adulthood (yes, you’re classy).

Views of Pixar Pier from Lamplight Lounge

Views of Pixar Pier from Lamplight Lounge

And now you can make one of these recipes in your own kitchen!

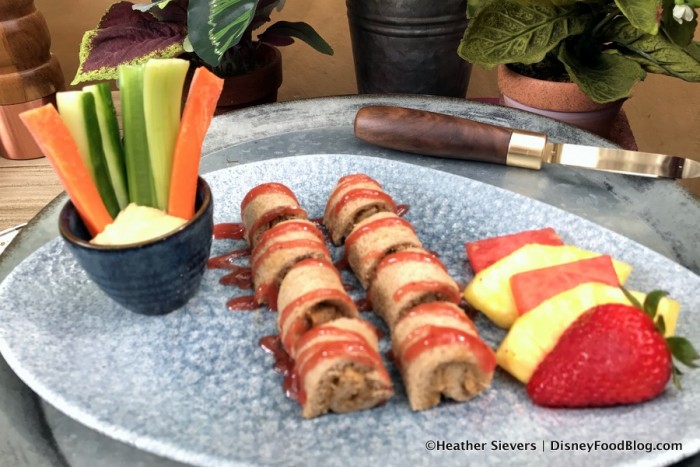
Lamplight Lounge’s Peanut Butter and Jelly Rolls use some of your pantry staples to create a snack that children and adults can both love! So put on your favorite Disney playlist and lets get cooking!

PB&J Roll Plate

PB&J Roll Plate

Ingredients

  • 8 slices wheat bread
  • 3/4 cup creamy peanut butter, divided
  • 3/4 cup strawberry or grape jelly

Preparation

For Peanut Butter Rolls

  1. Cut crusts off bread. Flatten bread with rolling pin until bread can bind after being rolled.
  2. Spread 1 1/2 tablespoons of peanut butter evenly on each slice of flattened bread, leaving small boarder on all sides – the peanut butter will spread as you roll.
  3. Starting with long side of bread, gently roll up each bread slice into spiral. Cut each roll into 4 even pieces.
  4. Place 8 pieces of rollups onto each plate, seam-side down.

For Jelly Drizzle

  1. Place plastic quart-size freezer bag into small cup, folding back first few inches of bag over top of cup. Spoon jelly into bag, gently shaking bag to move jelly to bottom of bag. (Note: If jelly is too thick to drizzle, add small amount of warm water to jelly in small bowl and mix to desired consistency before adding to bag).
  2. Once filled, lift bag from cup and squeeze out excess air from bag and seal bag with a few twists to top of bag. Cut bottom corner of bag with scissors.
  3. Holding right below the twisted top of bag with one hand and guiding with free hand, gently squeeze to drizzle jelly over each peanut butter roll with zigzag motion.

For a visual step-by-step, check out Disney’s video below!

Need even more Disney recipes? Check them out here!

Heather Sievers is DisneyFoodBlog’s Dining in Disneyland columnist! Check out more of her adventures at @DininginDisney on Instagram!

When you make a PB&J, do you put peanut butter on both pieces or bread or just one? Let us know in the comments!

Related posts:

  1. NEW! Orange Vanilla Coke and Honey-Mustard Chicken Wings Found in Disney California Adventure!
  2. The Birthday Mickey Cake Pop in Disneyland Is Basically The Cutest Thing Ever.
  3. Popcorn News! The New Mickey Light-Up Tree Popcorn Bucket Has Arrived at Disneyland Resort!

From our friends at www.disneyfoodblog.com
Filed Under: disney california adventure, Disneyland Column, Disneyland Resort, Featured, Recipe, Snacks, Disney California Adventure, Disney recipe, disney recipes, Disney snack, Disneyland, disneyland dining, Lamplight Lounge, PB&J rolls

Categories
Disney Food Disney Parks Disney Recipes Other

Disney Recipe: It’s Time for TOTCHOS from Woody’s Lunch Box in Toy Story Land at Disney’s Hollywood Studios!

From Lunch Box Tarts to a Grilled Three-Cheese Sandwich, there is more than one way to whip up a recipe from Toy Story Land in Disney’s Hollywood Studios to enjoy at home. And today, we’ve got one more for you, with the famous TOTCHOS from Woody’s Lunch Box!

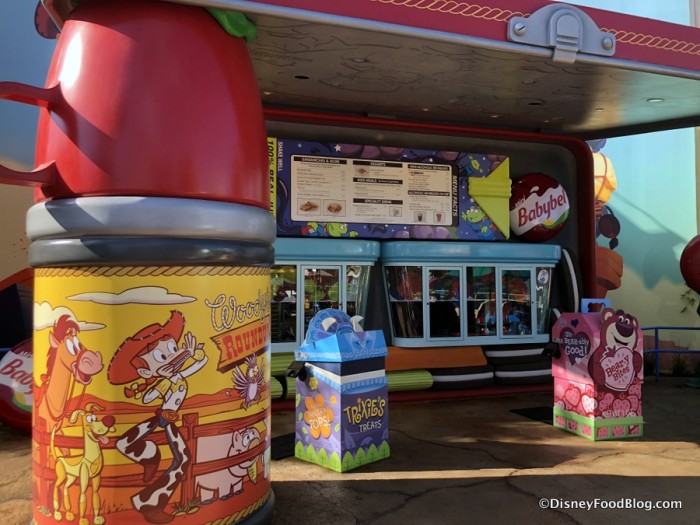
Woody’s Lunch Box

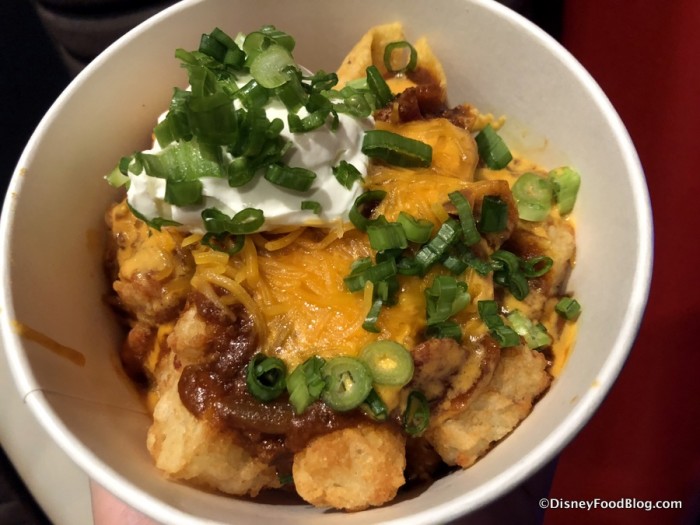
A batch of potato barrels (tater tots) are loaded up with chili, cheese, corn chips and more tasty garnishes to create this dish straight from Andy’s backyard!

Round up your fellow toys (family members!) for this tasty Toy Story Land treat!

Totchos

Ingredients (for 6 servings)

Chili with Beans

  • 1 pound lean ground beef
  • 1 medium yellow onion, finely chopped
  • 3 cloves garlic, minced
  • 1 (14.5 ounce) can crushed tomatoes
  • 1 (15 ounce) can tomato sauce
  • 1 (15 ounce) can kidney beans, drained
  • 2 tablespoons chili powder
  • 1 tablespoon ground cumin
  • 1 tablespoon coarse salt
  • Black pepper, to taste
  • Ground cayenne, to taste

Queso Sauce

  • 2 cups jar cheese sauce
  • 1 (10 ounce) can diced tomatoes with chilies

Totchos

  • 1 (2 pound) bag frozen potato barrels
  • 1 1/2 cups corn chips
  • Chili with Beans
  • Queso Sauce
  • 3/4 cup shredded cheddar cheese
  • 6 tablespoons sour cream
  • 2 tablespoons thinly sliced green onions

Instructions

Chili with Beans

  1. Brown ground beef in a 5-6 quart Dutch oven over medium heat until fully cooked. Drain off excess grease.
  2. Add onion and garlic and sauté for 5-7 minutes, until onion is translucent.
  3. Add crushed tomatoes, tomato sauce, kidney beans, chili powder, and cumin. Simmer for 20 minutes. Add salt.
  4. Add black pepper and cayenne, as needed.
  5. Keep warm until ready to serve.

Queso Sauce

  1. Place cheese sauce and diced tomatoes with chilies in small saucepan. Cook over low heat for 10 minutes, until warm.
  2. Keep warm until ready to serve.

Totchos

  1. Cook potato barrels according to package instructions.
  2. Divide potato barrels into 6 bowls. Place 1/4 cup each of corn chips, chili with beans, and queso sauce on top of each bowl of potato barrels.
  3. Top each bowl with 2 tablespoons shredded cheese, 1 tablespoon sour cream, and 1 teaspoon green onions.

You can also click here for a printable recipe, or check out the kitchen magic in action in this video from Disney below!

Will you be making up some Totchos in your kitchen? Please let us know with a comment!

From our friends at www.disneyfoodblog.com
Filed Under: Counter-Service, disney parks, disney’s hollywood studios, Featured, Walt Disney World, disney recipes, Disney’s Hollywood Studios, Recipe, Totchos, Totchos Recipe, Toy Story Land, Woody’s Lunch Box