Categories
Disney Cruises Disney Food Disney Recipes Disney Vacations

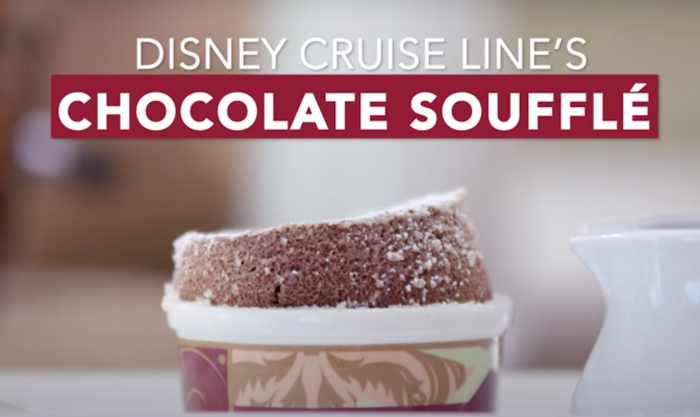
Calling All Chocolate Lovers! Learn How to Make the Disney Cruise Line’s Chocolate Soufflé with This Disney Recipe!

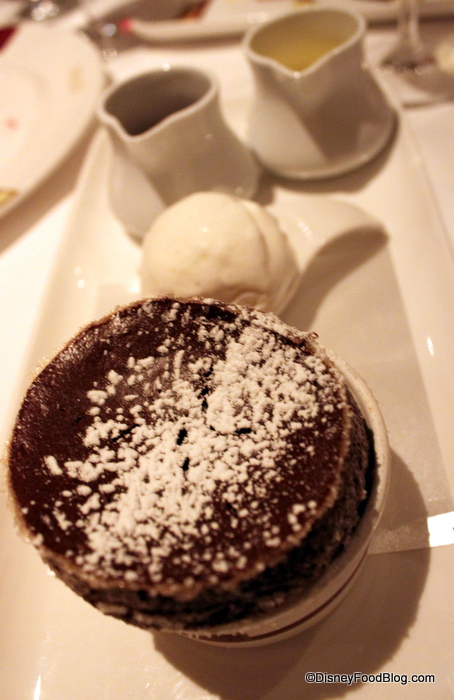
Palo on the Disney Cruise Line has a romantic atmosphere with some amazing food.

Calling All Chocolate Lovers! Learn How to Make the Disney Cruise Line’s Chocolate Soufflé with This Disney Recipe!

©Disney

While we’re missing taking a cruise across the big, blue ocean, we’re excited to be able to make THIS treat straight from the cruise ships in the comfort of our homes!

If you’re feeling up to baking a fantastic Disney Recipe, you can make one of Palo’s most famous desserts in your kitchen! Get that Disney kitchenware out because it’s time to make a fluffy Chocolate Soufflé to indulge in tonight.

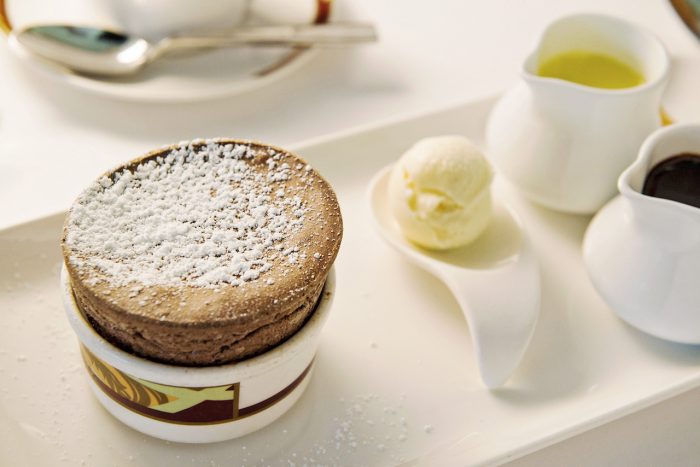
Palo Chocolate Soufflé

Ingredients

  • 3 tablespoons butter, plus more for greasing the soufflé cups
  • 6 tablespoons sugar, plus more for dusting the soufflé cups
  • 1 cup milk
  • 3 tablespoons all-purpose flour
  • 3 tablespoons Dutch-processed cocoa
  • 2 ounces (2/3 cup) semisweet or bittersweet chocolate, melted
  • 4 eggs, separated
  • Vanilla Sauce (recipe follows)

Recipe

  1. Preheat oven to 350°F.
  2. Set a full kettle of water on to boil.
  3. Butter six 4-ounce soufflé cups and coat with sugar; set aside.
  4. Bring the milk to a boil in a small saucepan. Meanwhile, melt the butter in a medium saucepan over medium heat. Add the flour and cocoa to the butter and beat with a whisk to a smooth, paste-like consistency. Reduce heat and cook for 1 minute.
  5. Slowly add the hot milk, whisking until smooth, then blend in melted chocolate. Let cool for 5 minutes, then stir in egg yolks.
  6. Beat egg whites in a separate bowl until frothy. Slowly add sugar, 1 tablespoon at a time, until stiff, glossy peaks form. Stir a heaping spoonful of egg whites into the chocolate, then fold in the remaining whites just until combined.
  7. Pour the batter into prepared soufflé cups. Place cups in a large baking dish and add enough boiling water to reach halfway the sides of the soufflé cups.
    Bake for 20 minutes. Serve immediately, with warm vanilla sauce.

Calling All Chocolate Lovers! Learn How to Make the Disney Cruise Line’s Chocolate Soufflé with This Disney Recipe!

©Disney

Vanilla Sauce

Ingredients

  • 1 1/4 cups heavy cream
  • 1/4 vanilla bean, split lengthwise
  • 3 tablespoons sugar
  • 2 small egg yolks

Directions

  1. Bring cream and vanilla bean to a low boil in a saucepan over medium heat.
  2. Combine sugar and egg yolks.
  3. Add 2 spoonfuls of boiling cream to egg mixture and stir well, then pour back into the remaining cream and continue to cook over low heat, stirring constantly for 3 to 4 minutes.

Calling All Chocolate Lovers! Learn How to Make the Disney Cruise Line’s Chocolate Soufflé with This Disney Recipe!

Souffle with Vanilla Gelato and Chocolate and Vanilla Sauces

This is one of those desserts that time is of the ESSENCE! Have everything ready and as soon as you pop this out the oven, dig in! Wow, we cannot WAIT for all that chocolatey goodness!! Chocolate Soufflé and Disney+ sounds like a GREAT night in!

[cysc id=’DFB_Guide_Newsletter

Have you visited Palo on the Disney Cruise Line? Let us know in the comments below!

From our friends at www.disneyfoodblog.com
Filed Under: disney cruise line, disney dining tips, Disney Entertainment, Disney News, Featured, News, Chocolate Souffle, Disney, disney dining, Disney Dream, disney fantasy, disney magic, disney news, disney parks, Disney recipe, disney restaurant, Disney Wonder, Palo
Categories
Disney Food Disney Parks Disney Recipes

Delicious Up Inspired S’mores Recipe!

Delicious Up Inspired S’mores Recipe!

Adventure is out there! And what better way to enjoy it then with some delicious Up inspired s’mores!

Because when you are traveling through South America you are gonna need some treats to keep your energy up. So why not something fluffy and sweet? We think s’more is a fantastic idea specially if they are in the form of “My Adventure Book” from UP! 

INGREDIENTS:

  • 12 large rectangular Graham crackers
  • 12 oz of chocolate bar or chocolate candy coating melted
  • 6 peanut butter candy melts
  • 1/4 cup of powdered sugar
  • 1-2 tsp of vegetable oil (optional)
  • Your favorite homemade marshmallow recipe
  • Red fruit leather or fruit tape
  • 2 tbsp each of tan, yellow or orange and black icing
  • 1 tbsp each of purple, red, blue and white icing
  • 7 piping bags fitted with #1 or #2 tips for each of the colored icings
  • 1 piping bag fitted with #44 tip for the white icing
  • Toothpicks

INSTRUCTIONS TO CREATE UP INSPIRED S’MORES:

Step 1: Make the covers of the Adventure Book using a serrated knife and cut 2 inches off the length of each graham cracker. The remaining cracker should be 2×3 inches

Step 2: Dip each cracker in melted chocolate. You can thin the chocolate with oil if you need

Delicious Up Inspired S’mores Recipe!

Step 3: To create the book binding, cut out a 2×1/2 inch strip of the red fruit leather or fruit tape. Use a bit of melted chocolate to attach it on the left side of the book cover

Delicious Up Inspired S’mores Recipe!

Step 4: Pour the marshmallow mix into a 9×13 inch pan heavily dusted with powdered sugar. Fill the pan evenly to a depth of 1/2 inch and allow to set

Step 5: Using a thin knife brushed with oil cut out 6 rectangles of marshmallow of 2×3 inches each

Delicious Up Inspired S’mores Recipe!

Step 6: Use the tan colored icing to draw a square and circular borders on each “Adventure Book”

Step 7: Attach a peanut butter candy melt chip under the text area. Then use black icing and a toothpick to draw the shape of North and South America on it

Step 8: Write “My Adventure Book” with colored icing fitted into pipping bags. Then pipe a black icing ribbon tie on the red fruit leather binding. To finish, pipe a thick line of white icing on the top left side of the globe to simulate a piece of tape

Delicious Up Inspired S’mores Recipe!

Step 9: Place a cut marshmallow in between one book cover and one plain graham cracker to complete your UP inspired s’mores!

Delicious Up Inspired S’mores Recipe!

And done! Now it’s time to enjoy your Up inspired s’mores while exploring the wilderness or watching Up on Disney+! 

Credit: Disney Family

From our friends at chipandco.com
Filed Under: Other Disney Stuff, Disney Snacks & Treats, Pixar, Disney Family, Disney Recipe, My adventure book, Pixar Up, Smores recipe, Up, UP smores

Categories
Disney Food Disney Parks Disney Recipes

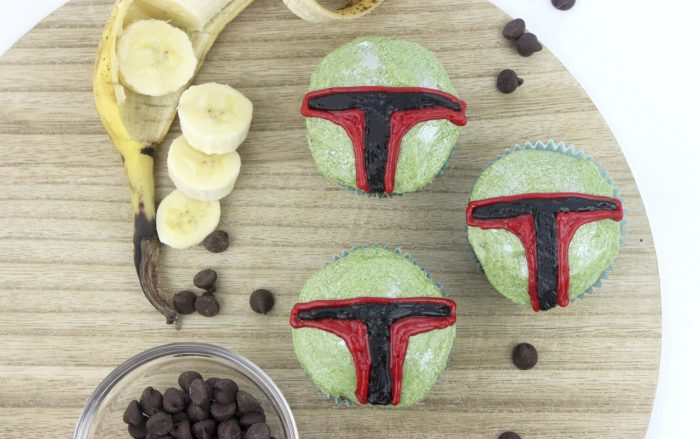
Recipe: These Boba Fett Banana Bread Muffins Are Out of This World!

Did you know that Star Wars: The Empire Strikes Back recently celebrated the 40th-anniversary of its theatrical debut? And what better way to celebrate than by baking up some delicious muffins!

Recipe: These Boba Fett Banana Bread Muffins Are Out of This World!

Millennium Falcon: Smugglers Run in Star Wars: Galaxy’s Edge

Looking for dessert after you’ve finished your Ronto Wrap and Fried Endorian Tip-Yip? These Boba Fett Banana Bread Muffins are Galactic Empire-approved!

Even the most fearsome bounty hunters have to refuel! So, whip out your apron and pre-heat that oven because it’s time to start baking!

Recipe: These Boba Fett Banana Bread Muffins Are Out of This World!

©Star Wars

Ingredients

Muffins

  • 2 cups all-purpose flour
  • 2/3 cup brown sugar
  • 1 teaspoon baking soda
  • 1/2 teaspoon cinnamon
  • 1/4 teaspoon salt
  • 1/2 cup (1 stick) unsalted butter, melted
  • 1/4 cup sour cream
  • 3 ripe bananas, mashed
  • 2 large eggs
  • 2 teaspoons vanilla
  • 1 cup chocolate chips
  • 1/2 cup walnuts

Frosting

  • 1/2 cup (1 stick) unsalted butter, softened
  • 3 cups powdered sugar
  • 3 Tablespoons whole milk
  • 1/2 teaspoon cinnamon
  • 1/2 teaspoon vanilla
  • Pinch of salt
  • Green food gel dye
  • Edible shimmer dust
  • Red food gel dye
  • Black food gel dye

Instructions

  1. Preheat the oven to 350 degrees. Prep a muffin tin with liners.
  2. In a large bowl, whisk together the flour, brown sugar, baking soda, cinnamon, and salt.
  3. Make a well in the center of the dry ingredients and stir in the butter, sour cream, mashed bananas, eggs, and vanilla, until just combined. Fold in the chocolate chips and walnuts.
  4. Spoon the batter into the prepped muffin tin. Bake for 17-19 minutes, until a toothpick test comes out clean. Let cool on a wire rack.
  5. In the bowl of an electric mixer, combine the butter, powdered sugar, milk, cinnamon, vanilla, and salt, until fluffy.
  6. Separate the frosting into three bowls, placing 1/2 in one bowl and stirring in the green food gel dye and shimmer dust to create a metallic icing. In the second bowl place 1/4 of the frosting, stirring in the red food gel dye. Into the third bowl stir the remaining frosting with black food gel dye.
  7. Spread the icing onto the muffins to create Boba Fett’s signature look.

We know we’ll be baking these Boba Fett Banana Bread Muffins to get our Star Wars fix until our next visit to Star Wars: Galaxy’s Edge!

Have you baked these Boba Fett Banana Bread Muffins? Share your review in the comments!

From our friends at www.disneyfoodblog.com
Filed Under: Featured, News, Recipe, Snacks, banana bread, banana bread muffins, Boba Fett, boba fett banana bread muffins, Disney recipe, disney recipes, disney recipes at home, DIY Disney Recipe, diy disney recipes, star wars recipe

Categories
Disney Food Disney Parks Disney Recipes

Make this at home – Sorcerer’s Hat Cake Pops Recipes

Make this at home – Sorcerer’s Hat Cake Pops Recipes Cake Pops

Today, we are introducing another Disney-inspired dessert based on Disney’s Fantasia. The Sorcerer’s Hat Cake Pops are a hit at parties and upcoming celebrations. If you want to learn how to create your own, then continue reading below!

Ingredients

  • 1 box cake mix (bake as directed on box for 13 x 9 cake)
  • 1 can (16 oz) of ready made frosting
  • Wax paper
  • Baking sheets
  • White candy coating
  • Blue candy coating
  • Chocolate covered mints (such as Junior Mints)
  • Yellow jumbo star sprinkles
  • Yellow candies (such as Starburst)
  • No. 807 Decorating tip
  • No. 12 Decorating tip
  • Toothpicks
  • Small paintbrush
  • Paper lollipop sticks
  • Styrofoam block

One cake mix makes roughly 48 cake pops. You’ll need at least one ounce of candy coating for each cake pop you plan on dipping and more for any extra decorating.

Directions

After cake is cooked and cooled completely, crumble into a large bowl.

With a large spoon, mix cake thoroughly with about 3/4 of the can of frosting. You won’t need the rest.

Roll mixture into quarter size cake balls and place on a baking sheet covered with wax paper.

Once you have rolled the cake balls, you can then re-shape them into cones. Get the shape started by hand molding and then lay the cone shape on the wax paper and roll back and forth gently to help smooth out the shape. You can also rub the bottom side on the wax paper gently to help flatten the bottom.

Place the cone-shaped cake balls in the freezer for about 15 minutes to firm up. You can transfer them to the refrigerator to keep chilled and avoid freezing.

While the cake is chilling, you can make moons for the hat. Work with one Starburst candy at a time. Place it in the microwave for just a few seconds to make it more pliable. Then using a small glass or rolling pin, roll the candy flat. To make the moon you can use two small circular edges to cut the shapes. Decorating tips are the perfect size.

Cut out circles with the smaller end of a No. 807 decorating tip, then use the small end of a No. 12 decorating tip to remove another circular shape from inside the larger circle to create moons. Repeat with more yellow candies as needed.
Note: You can also place them on the side of the large tip so they remain slightly curved and therefore easier to attach to the cake pop shape.

Make this at home – Sorcerer’s Hat Cake Pops Recipes

Melt white candy coating in a heat-proof plastic bowl so that the coating is at four inches deep for easier dipping. Melt in the microwave in 30 second intervals on low, stirring in between. Repeat until melted and smooth. Add blue candy color and stir until completely combined and you achieve the desired shade of blue.

Make this at home – Sorcerer’s Hat Cake Pops Recipes

Remove a couple of cake balls at a time from the refrigerator to work with.

Dip the tip of a lollipop stick into the melted coating and insert into the bottom of the cone shape. Dip the cake pop into the coating and remove in one motion without stirring. Make sure the entire cone-shaped cake ball is covered. Using a deep bowl is helpful here. If your coating is too thick, you can add a few drops of vegetable oil or shortening to help thin it and make it easier to work with.

Remove and allow any excess coating to fall off the pop and back into the bowl.

Attach a Junior Mint to each side of the hat for Mickey’s ears.

Make this at home – Sorcerer’s Hat Cake Pops Recipes

Then, while coating is still wet, attach two star sprinkles and one moon. Place in a styrofoam block to dry. You can also attach the stars and moon after the coating sets by using a toothpick to dot a small amount of coating to use as glue.

Make this at home – Sorcerer’s Hat Cake Pops Recipes

You can wrap your Sorcerer’s Hat cake pops in treat bags tied with a ribbon and/or store them on the counter or in an airtight container.

Let us know if  you make your own cake pops using this recipe!

Source: Disney Family 

From our friends at chipandco.com
Filed Under: Disney Food, Disney Snacks & Treats, News, Other Disney Stuff, disney dessert, Disney Recipe, Fantasia, mickey mouse, Sorcerer’s Apprentice

Categories
Disney Food Disney Parks Disney Recipes

Donald Duck Cupcake Recipe

Donald Duck Cupcake Recipe Donald Duck

Who gets stuck with all the bad luck?! No one, but Donald Duck!

We can remember this catchy tune being used in the introduction of Donald Duck’s classic cartoon shorts. Fortunately, Donald gets to enjoy being a lucky Duck this week! He first appeared on June 9, 1934. Today, we’ll show you how to make your very own Donald Duck cupcake so you can celebrate at home.

Ingredients

  • Batch of baked cupcakes
  • White frosting
  • Yellow Swedish Fish candies
  • Kitchen knife or scissors
  • Small black jellybeans
  • Tube of black decorating icing

Directions

  1. Frost the cupcakes, using the knife to pull the frosting up into a couple feathery peaks at the top of the head.
  2. For a duck bill, slice a yellow Swedish Fish candy in half lengthwise. Then press the two halves into the frosting, separating them slightly, at the very edge of the cupcake top (opposite the feathery frosting peaks).
  3. For eyes, press two black jellybeans into the frosting. Use the black decorating icing to pipe on curved eyebrows about 3/8 inch above the eyes.

Donald Duck Cupcake Recipe

We hope you enjoy making this Donald Duck cupcake at home! It’s a great way to celebrate his birthday while watching classic Donald Duck cartoon shorts on Disney+ streaming service.

Photo Source: Disney Family

From our friends at chipandco.com
Filed Under: Disney Food, Disney & Co, Disney Snacks & Treats, disney cupcake, disney kitchen, Disney Recipe, Donald Duck, donald duck birthday